

Thursday, December 22, 2011
Tuesday, November 29, 2011
Lost drawings from 2007
I found these 3 lost drawings in did in 2007. i don't remember making any of them. Found them in some manila envelope in my 20 year old portfolio tucked away in a corner. They're done on thick Crescent illustration board and are all 8x10 inches.

 I also found a super old drawing i did of the sex pistols thats all torn up from like 1981. And the score of the day was a magic marker drawing of Spider-Man i did when i was about 8.


Sunday, November 27, 2011


Tuesday, November 22, 2011
"Space Oddity" Giclee Print Pre-Orders Start Now!
Edition of ONLY 20. Large size 24x30"
Signed Numbered with Certificate of Authenticity.
Email me at johnjohnjesse@earthlink.net to get one!
 Better hurry!
Signed Numbered with Certificate of Authenticity.
Email me at johnjohnjesse@earthlink.net to get one!

Tuesday, November 15, 2011
New Painting "Space Oddity"

Tuesday, November 1, 2011
Heath Ledger Joker Cat

On some crappy days one look at him and i smile and laugh a little.
He's going to be the newest internet sensation. Maybe even President!
Look into his menacing eyes. He's hypnotizing you. Controlling you. "Steal the monies...do it...do it."
I'm not a cat person at all so for me to post a cat picture, this must be some super fuckin cat!
Who's cat is this???
Friday, October 14, 2011


Wednesday, September 28, 2011

Wednesday, September 21, 2011
Antique Wind-Up Whiskey Bunny


Of course i got him. I inspected for any maker markings but i couldn't find any. But Ive had him in my prized curio cabinet since and every now and then i'll have him do a shot for me since i no longer drink. I love him.

Monday, September 12, 2011
Star Wars Studio Scale Snow Speeder DONE!!!!


Wednesday, August 24, 2011
My Best Friend's Birthday!

I love her soo much. She still looks like a pup. We don't age in this family. We have magic powers.
Thursday, August 18, 2011
Studio Scale Snowspeeder Work in Progress
Hey comrades. so i've had this Neisen/Salzo studio scale Snowspeeder for everal months and have been putting it off cuz basically "how the hell am i gonna pull this off" goes through my head. but YES it's time. It is HUUUUUUUGE!!!!! should build to over 18 inches. I plan to paint it up as Wedge's snowspeeder with the orangey-red stripes. Most of the work actually i would like to focus on is making the cockpit super detailed , possibly leather seat belts and whatever i can scratch up.
One great thing is the resin casting is SUPERB and it appears to have very little clean up involved for me. barely an airbubble in sight.
Check back often for updates to the build.


 Part Three:
I drilled out a hole in the bottom to house the brass stand. I inserted an aluminum tube at a slant on the inside, doused it with epoxy and cleaned up the outer area with tamiya putty and then after sanding that all smooth i added a sliver of brass tube to keep it neat.
I used my trusty pinvise to re-tap out all the rivet holes that were blurred from the casting.


One great thing is the resin casting is SUPERB and it appears to have very little clean up involved for me. barely an airbubble in sight.
Check back often for updates to the build.


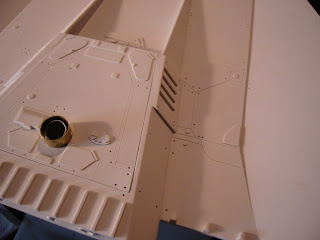
Part One:
I got alot of parts sanded and cleaned up and started glueing some engines together as well as the 2 pilots. The cockpit tub is not glued in yet as it will need to be primed and painted first to get every nook and cranny,


Part Two:
More bits assembled including the targeting system for the rear pilot, the blasters and the rear plate.


I actually thought i had filed and sanded down all the parts but i found a big bag of little parts that weren't done yet, so AAAARGH.
I was planning on doing full fiber optics and LEDs in the cockpit but I am soo burnt out from the entire Trench Run build, it's just not enjoyable to do right now so maybe next project. I'll make sure to paint and build this one up extra super to make up for the lack of lighting bling.
At this point my workshop table is buried in toxic resin dust...Blah.

I drilled out a hole in the bottom to house the brass stand. I inserted an aluminum tube at a slant on the inside, doused it with epoxy and cleaned up the outer area with tamiya putty and then after sanding that all smooth i added a sliver of brass tube to keep it neat.
I used my trusty pinvise to re-tap out all the rivet holes that were blurred from the casting.


Part Four:
Update TIME!! You can clearly see the size difference in the old MPC model kit..Its rediculous! (see pic)

I didnt know there was this exhaust manifold in between the rear cooling fins. it has 4 ports each so does the Snowspeeder run on a V8 engine? A small block 350 chevy? awesomeness indeed.

I installed the bottom rudders but somewhere i miscalculated and theres a gap in the right side so maybe ill ram in some t-track cut to fit snug in there.
On the tip of the cannons I replaced the front tiny guns(?) by simply tapping out a small hole with my pinvise and cutting a small piece of brass tubing, just for that extra detail.

As you can see the model is almost fully built. I am not installing the rear fins nor the top rudder covers till after paint as they need special attention on their own and it would be a nightmare to mask around it.


Part Five:
Tonite I didn't do too much besides scratch build some control sticks since the kit had none. I gave 2 to the front pilot and 1 to the rear gunner/harpoon pilot. I couldn't locate any real pics online of the controllers in there so i took a liberty. I made them out of brass rod (not tube), since it is not hollow and won't crimp when i stick it on a mini table vice and bend it with rounded pliers (to not scratch it up).

Some spring (Mecha Skunk Piano Wire Extention) for the bottom of one in the front.

One one of the top rudders that i am keeping open in the final build i added a little plumbing line and some metal greeblies.
Primer is about to start very soon. YEHH!

Part Six:
So as i get closer to primer i decided at looking at reference pics how packed with tubes, wires and cables the cockpit was. So i started coiling up some wire made some mounts for them and added tubing to the front and rear pilots using the Mecha-Skunk springs.

These things rule. i ordered multiple packs of these recently in different sizes and the uses are endless in Star Wars and probably alot of other sci-fi builds. I attached them by tapping the appropriate size hiole and inserted a small piece of brass tube that was just slightly thinner than the spring. nice snug fit.


Tomorrow I am going to make some seatbelts. Apparently according to ref pics the belts were racing harness seatbelts. I think. And they are grey. I'll figure it out.

Part Seven:
Finally got to primer her using Plastikote White rattle can...The base coat went on too a few hours later using Vallejo Deck Tan and Flat White through my Badger Velocity Airbrush. That basecoat mix is my usual mix for my "REBEL" fleet builds.


The cockpit console, sidewalls and floor are painted with Vallejo Blue Grey Pale and the floor is misted with a thinned Sepia.

Part Eight:
Ok so i got the pilots base coated and pained but still need to detail and hade their faces as well as add a slight weathering to their uniforms.

A couple of evenings later....The Speeder pilots are done!


Part Nine:
Last night and tonite were super productive. The cockpit and canopy are finished!
The decals the kit came with are fantastic for an garage resin kit. They went on trouble free and were die cut for easy release. Nice!

I Just have to route some wires inside with some angled tweezers but thats it. Weathering was done with grounded brown and black pastels and also some MIG Productions' pigments.


The canopy isn't fully glued down yet but will handle that tomorrow.

Part Ten:
Last night i masked and chipped the grey and red markings. Tonite I'll try and get that top done. We're slowly getting there!


All orange-red striping and chips are done! Next step...the decals.


Decals on. Next is my favorite step. the weathering. yehh!

Subscribe to:
Posts (Atom)